Featured

To update to WordPress 5.6 or not!

Questionable Plugins
Remove any questionable plugins. These are plugins that appear that the creator or developer has stopped doing updates on the plugin. Known to many as Abandoned plugin(s). This also can be plugins that you no longer use. If needed replace the plugin with another that compatible with WordPress 5.6
Note that deactivating a plugin is different from deleting a plugin. I would delete the plugin. It is also possible that right after the WordPress update comes out, that the developer comes out with their own updates. Only then will I reinstall that plugin.

Full Backup
If it has been a while since you completed a full backup of your files now would be the time to do this.

Update PHP?
As for PHP, here is my rule of thumb: if a new version of PHP is out, I like to wait for a while before I rush out and update PHP. SO as an example I am currently running PHP 7.3.4, I am ok with waiting to update to PHP 7.4. I will wait longer for PHP 8.

Do the Update!
Once all the above has been completed go ahead and update to WordPress 5.6.

Another Backup:

Now for the catch after you have completed the update and you see no issues with your site, completed another full back. I like to use Updraft for this task.

Firewall Scan
At the time of writing this article I have completed these updates on four websites running WordPress without any issues. Using the “Wordfence” firewall I did run a new scan to make sure there were no surprises.
Read the Post by Wordfence

Featured

Install Dropbox, kdenlive video editor and recordMyDesktop in Ubuntu 16.04

Updated and tested 04/10/2021

  1. Installing Dropbox

sudo apt-get install nautilus-dropbox

Now we can look in Ubuntu Software Center and looked at installed, selected Internet to see that Dropbox has been installed on today’s date. After you have logged on Dropbox you will see the Dropbox folder icon appear in the upper right hand corner of your desktop.

  1. Installing kdenlive video editor (lower case K)

sudo apt-get install kdenlive

Now we can look in Ubuntu Software Center and looked at installed, selected Sound & Video to see that Kdenlive has been installed on today’s date. Selecting kdenlive More info button you will see that many of the optional add-ons have also been installed that work with kdenlive.

You can find out more about kdenlive at their web site. https://kdenlive.org/

Be sure to check out their ToolBox for training videos on using kdenlive. https://kdenlive.org/toolbox/

  1. Installing “recordMyDesktop”

One of the problems I have is recording my desktop. After some searching I found and installed “recordMyDesktop”

To install using terminal run the following command:

sudo apt-get install recordmydesktop  gtk-recordmydesktop

updated 04/10/2021

  1. Again run sudo apt-get update when you have completed all installs.
Featured

How to install Bluefish Web Editor Ubuntu 16.04

Using Terminal complete the following…

It’s always a good practice to do update first before installing a new packages.

sudo apt-get update

How to install Bluefish Editor run this command in terminal

sudo apt-get install bluefish

At this point I like to do another update.

sudo apt-get update

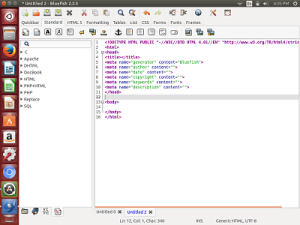
Now we can look in Ubuntu Software Center and look at installed, selected Developer Tools to see that Blue Fish has been installed on today’s date.

Now I want to take full advantage of all the utilities offer that works with Bluefish so let install the following:

XML utilities run

sudo apt-get install libxml2

                HTML Syntax checker and formatter tidy

sudo apt-get install tidy

                Syntax minimal Style checker for HTML

sudo apt-get install weblint-perl

At this point run again

sudo apt-get update

Featured

Installing and Using VNC Ubuntu 14.04

Change settings in Desktop Sharing for local remote connection

In my Ubuntu 14.04 Trusty OS I needed to first make some changes to the Desktop Sharing.

To do this search your Linux computer for Desktop Sharing.

Open Desktop Sharing, and check or unchecked the following:

Know your system.

Command lsb_release -a gives you the system information

You will see Distributor ID: Ubuntu

Description: Ubuntu 14.04.5 LTS

Codename: trusty

Preform updates and upgrades before installing VNC

Anytime you are getting ready to do install you should run updates and upgrades

Run sudo apt-get update

Then sudo apt-get upgrade

Install VNC on your Linux system

Now is the time to install VNC on ubuntu 14.04

sudo apt-get install tightvncserver

After install is completed set screen resolution as follow;

 vncserver -geometry 1366×768

Run vncserver

You should now see your <computername>:: 1

To make sure vnc server is running on your Linux os type

vncserver

Note: to end vnc server you would enter.

vncserver -kill :1   (:1 is the session number running, it could be :2 )

You will see a message that reads Killing xtightvnc process ID ####

ALWAYS a good idea to end your VNC connection!

To start vnc server just type vncserver

You will see a message that reads, New X desktop is <computername>:1

To connect from your Windows computer to your Linux OS you need to know the current ip address of the Linux OS. Remember I’m using Ubuntu could be different in Fedora.

Install and run netstat -l to confirm port

See what port is listening, it should be 5900?

To do this do netstat -l | less     Note:(lower case L)

IF you need to install netstat fo the following;

sudo apt-get install netstat-net

                   Now try netstat -l |less

My computer shows 5901 is listen! Note the port that listen on your system.

Run ifconfig to get your current IP Address

Type the following: ifconfig

You should inet addr: <ipaddress> note the ip address is this line. Example in my case the ip address is 198.168.0.105

Install and run tightvnc on your Windows machine

Now in tightVNC Viewer  (client ) enter the ip address as 198.168..0.105:: 5901 Note two colons and 5901 is the port number!

What if you get a gray screen.

If you get a gray screen, this means you made a completed connection using VNC but we need to edit the xstartup using vi  or vim.

To do this do the following:

cd  .vnc/

Run command ls to confirm that you see xstartup

Run vi xstartup

Add this line to bottom of the file

/usr/bin/startixde

As shown.

Note that these instructions are for installing VNC on a Ubuntu 14.04 operating system and my be different on other Linux systems, such Fedora. You may have to do some research for your operating system and or version of OS.

What you will learn by installing and using vnc remote.

Working with Desktop Sharing

  1. lsb_release -a
  2. sudo apt-get update
  3. sudo apt-get upgrade
  4. sudo apt-get install tightvncserver
  5. run vncserver to start the service
  6. vncserver -kill :1 to end the session 1
  7. netstat -l | less to look at short list of ports
  8. if need sudo apt-get install netstat-net if netstat is not installed
  9. ifconfig to your IP address information and more
  10. Using tightvnc viewer which would be installed on your windows system.


To update to WordPress 5.6 or not!

Questionable Plugins
Remove any questionable plugins. These are plugins that appear that the creator or developer has stopped doing updates on the plugin. Known to many as Abandoned plugin(s). This also can be plugins that you no longer use. If needed replace the plugin with another that compatible with WordPress 5.6
Note that deactivating a plugin is different from deleting a plugin. I would delete the plugin. It is also possible that right after the WordPress update comes out, that the developer comes out with their own updates. Only then will I reinstall that plugin.

Full Backup
If it has been a while since you completed a full backup of your files now would be the time to do this.

Update PHP?
As for PHP, here is my rule of thumb: if a new version of PHP is out, I like to wait for a while before I rush out and update PHP. SO as an example I am currently running PHP 7.3.4, I am ok with waiting to update to PHP 7.4. I will wait longer for PHP 8.

Do the Update!
Once all the above has been completed go ahead and update to WordPress 5.6.

Another Backup:

Now for the catch after you have completed the update and you see no issues with your site, completed another full back. I like to use Updraft for this task.

Firewall Scan
At the time of writing this article I have completed these updates on four websites running WordPress without any issues. Using the “Wordfence” firewall I did run a new scan to make sure there were no surprises.
Read the Post by Wordfence

Installing Apache2 Server, MySQL DB, and PHP on Ubuntu 16.04

Updated 04/10/2021

First thing we need to do is run updates, so login as root.

sudo apt-get update

Second step is to install apache2

sudo apt-get install apache2

Test apache2 server

To see if apache2 was successfully installed

Open web browser and type in 127.0.0.1

Note to view IP address and local loop back address run ifconfig

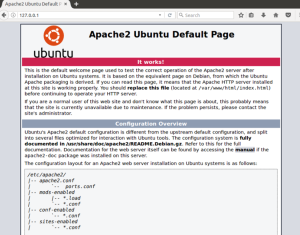
You should see Apache2 Ubuntu Default Page

“It Works!”

This maybe the best time to go over with you stopping, reload, and starting apache2 server.

NOTE

To start, reload or stop apache2 server.

There are couple different methods to doing this. I like and want my students to use;

sudo service apache2 stop

sudo service apache2 start

sudo service apache2 reload

Note this is different for other OS so you should look up those methods that work for you Linux OS.

Third Step is to install MySQL Server

sudo apt-get install mysql-server

It will ask you for your root password. THEN ask you to set a root password into MYSQL! SAY N to keep the current root password or Y to change the password.

I recommend that my students take No.

Now after install mysql is completed it time to test to see if it’s work.

mysqladmin -u root -p status 

Enter root password.

You will see uptime, Threads, Questions and so on. 

Success! 

I did notice that the step to installing MySQL have streamline since ubuntu 14.0 much faster install in 16.0 

Forth Step install PHP

sudo apt-get install php libapache2-mod-php

By default, the web site directory path is /var/www/html

With that in mind, create and save info.php to html  

To do this open and create new document

<?php

phpinfo();

?>

Note to create this you can use Web Editor such as Bluefish or use vi editor

vi   /var/www/html/info.php

Remember to save it to the html directory as info.php (not info.php.php)

Now to test it and see if PHP is working

Go to http://yourserveripaddress/info.php

This is what you should see:

What if it fails to work!

You may be getting a message that you don’t have permission to the directory var/www

You can see the permission of /var/www has, by this command

ls -l /var/www 

You will see like this (this only for example): (That’s Lower Case L not 1.)

Again, If there is a permission issue when trying to view the info.php complete the following:

Run

ls -l /var/www

to view who currently has rights to that directory.

To add yourself as having rights to that directory do the following:

sudo adduser yourusername www-data

After you completed this task you need to give yourself  “R“  rights permission and ownership to  your name.

sudo chmod -R 775 /var/www

Look again to see your user name is added to the group

             sudo ls -l /var/www 

If you see your user name… success!

 How to install Bluefish Web Editor Ubuntu 14.04

Related link: https://cit101blog.wordpress.com/2018/05/25/cannot-get-the-php-to-display-using-wamp/

Print Friendly without ads

There are times when you find an article or two that you would like to read but just don’t have the time or you would like to read that article in paper form so you can highlight and add notes.

The problem with reading the article that you printed out is that it’s full of ads. Also those ads use up printer ink. When you’re working from home saving money on ink this means a lot. For many people reading an article without the ads makes it easier to read and looks professional if sharing with others. 

I am going to show you two different ways I have used to print that article without the ads.

Using Firefox for print friendly article:

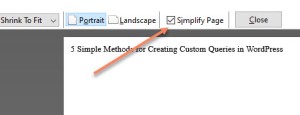
The first way is to use Firefox. If you are viewing the article in Firefox select the menu dropdown to PRINT and select print. The page will appear as is. Select the box that says “Simplify Page” . Once you select that option the page will cycle and refresh showing the page without any of the ads.

However if this article is a technical article with additional images, charts, and steps for performing a task, they may also be removed. 

Using Chrome for print friendly article:

I like to use Chrome and an extension named Print Friendly & PDF, which gives a choice to which ad(s) and images to remove before printing. With the mouse you roll over the ads in the article and they will turn yellow with a trash can icon that will appear on each. Right click on each one and the ad will be removed so you can print the page ad free. 

When you’re viewing the article in Chrome select the extensions icon in the upper right corner of Chrome. I small dropdown menu will appear and from there select 


At this point show respect for the author by not removing the author’s name, date of the article and title. Sometime you will see a BIO of the author at the bottom of the page be nice and leave that BIO there.  

 Keywords to search for this extension in Chrome is ”printfriendly chrome” or go to printfriendly.com 

Side Note: I have found that Firefox may do a better job with an article then Chrome and, vice versa, also work the other way too. Point if you are printing an article to share with others try both firefox and Chrome. 


WordPress Working with Date and Time Picker

Sometimes you hesitate writing about some plugin for the simple reason that plugin(s) come and go or become no longer supported. After working with a friend that had trouble with Date Time Picker Field by Carlos Moreira I decided it would be worth my time to write this up.

I am working with version 1.8 plugin and I am working with WordPress 5.5 to test the plugin. My goal was to create two simple tests using this plugin in Contact 7 form and on a simple page that I created for date and time.

We will assume that you know how to install the Plugin and activate the plugin. We will assume that you had some working knowledge with Contact 7 Form.

Contact Seven Form 5.2.2

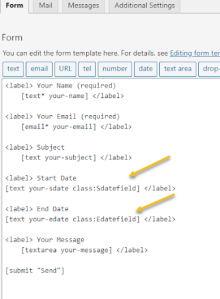
In contact 7 I created a new form named that new form start date. As you see below I created a simple class of Sdatefield and Edatefield. The text is your-sdate and your-edate. The key here is to keep it simple.

I wanted the person using my form to select start date and end date. For this test I did not make these options in the form required fields.

I also wanted the start and end dates to appear in the email with the form submitted. As you can see in the screenshot below I am working on the message body of the Mail tab of Contact 7.

Add Start Date:[your sdate] and add End Date:[your edate]


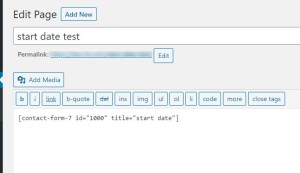
Now at this point you want to copy the shortcode and paste that shortcode to your post or page in wordpress. I named the page for this form start date test. You can name your page or post whatever you want. NOTE the shortcode below is the ONLY example, your shortcode will be different. 


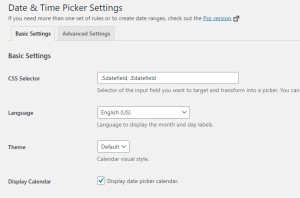
Now before you will see this start and end date on your form you MUST first add the class to the Date Time Picker Field in settings. 

Note the uppercase S and E in the CSS Sector you should now have .Sdatefeild amd Edatefield.

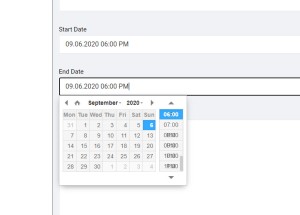
Now going back and doing a preview on your page or post and if you did everything right you will see a functioning Start Date and End Date on your new contact 7 form. 


As you can see my calendar in this example shows the Month Year and Time. You can play around within the basic settings and change the Date Format.

Testing your contact 7 form and you should receive an email where the Start Date and End Date appears in the body of the email. 

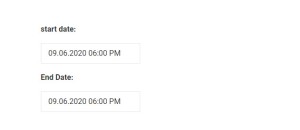
Now let’s look and create a page and name that page date. As you see below I created two input fields one is class=”sdatefield” and the other class=”edatefield”.  What’s important to note is that I have to add the shortcode to the page where the date and time will appear. The shortcode [datetimepicker] is staying, in the plugin, hey this is the page to display the date and time or calendar. 

This is what you will see on that page.

Now let do this in the Basic Settings you have the following options. 

If you remove the shortcode from your date page and checked the radio button for Across the full website, your date page should still work. Be sure to save the change. As seen below. However your Contact 7 form will no longer display the calendar options.

I think it is good practice to add the shortcode to the page and select Only when the shortcode [datetimepicker] exists on a page.  IF you have no other pages that use date time picker.

In our case we have one page and one form that;s using the date and time picker so we need to select is Across the full website. 


WordPress Contact Form and Sidebars Text is Missing

Long time since I wrote anything up for the blog…but it’s time.

Anyone who’s worked with WordPress knows that you need to keep up with all the updates for the Themes, widgets and any Plugins running on your sites. A couple of weeks ago, I ran four updates for one Theme and a couple days later I ran another up for Contact Form 7. Usually, I would check my site to make sure nothing failed after the updates. This time I waited for a couple weeks.

When I did get around to checking the site again, I found the following.

The sidebar text did not appear, using the Easy Custom Sidebar plugin.

The text was missing in Contact Form 7.

The error message for Contact Form 7 was also missing.

It didn’t take long for me to realize that the text was but had been turned white with a white background and you could not see the text.

After several different attempts to fix the errors, I had created and added custom CSS to repair the site.

Below is that I have added to the CSS file to create any issues from the updates. At this point I went ahead did some more custom CSS for the Contact Form 7 to correct the appearance.

Here is what I have added. Feel free to use for your site. From your site go to Customizing and select Additional CSS copy and paste what you need.

/* Contact form 7 Style  ,wdcf7 */

.wpcf7 {

background-color: #DBDBDB;

border: 2px solid #666666;

}

.wpcf7-form {

margin-left: 25px;

margin-right: 25px;

margin-top: 25px;

margin-bottom; 25px;

}

.wpcf7-textarea{

width: 85%;


}

.wpcf7 input{

width: 10;    /*used to correct the usually large send button contact form 7 */

}

.wpcf7 p {

color: black;  /* used to correct white label text against white background on contact form 7*/

}

.wpcf7-response-output{

color: black;   /* used to correct response white text against white background on contact form 7 */

}


@media only screen and (max-width: 767px) {

figure.alignleft, img.alignleft, figure.alignright, img.alignright {

float:none;   /*used to correct image issues when page appears on mobile devices.*/

}

}

.textwidget p{

color:black;   /.* fixed the white text against white background sidebar */

}


I hope this helps others working with WordPress.


Change back from Block Editor to WordPress Classic Editor

Like many users I really did not like the “new” WordPress install editor. The one known as “Block Editor”. Like many of you I gave it a try and it didn’t take long for me to move back to the classic editor. Here’s how to make that move.

Under plugins, select Add New, and look for and install Classic Editor by WordPress Contributors. The newest version of this date is Version 1.5.  After the install Activate the Classic Editor plugin.

To learn more about Classic Editor or to download and install this plugin select this link below.

Classic Editor

After the install is completed and the plugin has been activated you need to go into settings for that plugin.

Under Writing Settings select Classic Editor as the default editor for all users. Now in my case I am the only user of this site, so I selected NO to allowing users to switch editors. You need to make decision to allowing users to switch between editors. Be sure Save your Changes.

WAMP Server will not startup after updating Addons

WAMP Server wouldn’t startup after updates….

After completing updates on addons for WampServer I had problems with WAMP Server starting up and lost icon on tray.

Here is the run down:

First be aware I am working with Windows 10 Pro and I am running WAMP as localhost for web development. I had update WampServer from 3.1.0 to 3.1.8 which is minor update.

After that update, and recent known security issue with Apache, I decided to update, Apache, PHP, MySQL, and MariaDB. In that order I completed each addon update and WAMP seems to work great, until I updated MariaDB.

Here what I started with.

Since I completed the updates in an orderly fashion it was clear that MariaDB was causing my issue. So, to correct the issue, I moved MariaDB BACK from 10.2.38 to 10.2.8. This correct the issue with WampServer starting and now the icon does appear in tray.

I also moved PHP back to 7.1.9 from 7.3.3 which cleared up this error listed below. Also, this version gave a strange appearance to phpMyAdmin.

I really did not want to take time to correct and line item in FormDisplay!

Here is what I ended up with after updates and correction. Now everything is working correctly.


I hope this helps!

Steps to improve your computer’s performance

These are steps that I do the start of new year and each month to improve my computer’s performance. I perform this minor task on all my devices.

1. Create filters for my inbox to remove spam, and move them  to deleted folder.

2. Update Virus Program run full scan and setup new schedule to run scan.

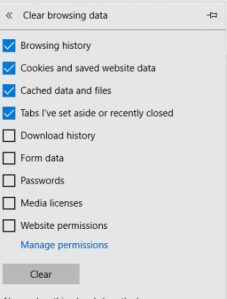
3. Delete browser history on all the browsers on my computer.

When we perform these minor task we are removing cookies, reducing spam, removing and blocking pop-ups ads, and other files that are system no longer needs, such as old download files. If you are like me, you have  more then one browser on your computer.  These are steps for the top three browser used today, Chrome, Firefox, and Internet Explorer.

Key search words are;
Delete your Chrome browser history

Delete your Firefox browser history

Delete your Internet Explorer history


I like to use CCleaner to help keep unwanted files from my all my devices. There is a free version and a Professional version for the low cost I use the professional version.

Warning that this could take some time to complete if you have not cleared your history for a while. Also, when you clear your history you will need to sign back into your online emails and other applications you run from the browser. However if you were to perform this task every week it you help to keep your computer healthy.

Install the newest version of Contact Form 7 with reCAPTCHA v3 for WordPress

Install the newest version of Contact Form 7 with reCAPTCHA v3

Log into your Google account before you start.

If you don’t have the form created, go ahead and do that now.

Go to contactform7.com/docs to see instruction for creating the form.

From your Dashboard Under Contact Form select Integration.

In the reCAPTCHA window select the link to google.com/recaptcha

In the new page select My reCAPTCHA

You should be at Manage your reCAPTCHA API Key

Under Register a new site, add Label for this project.

I used domain name here, you can used whatever you want.

Choose the type of reCAPTCHA

Select reCAPTCHA v3

Under Domains (one per line)

Enter your domain name.

I used one domain name per keys, Why? To make it cleaner to manage more than one domain account

Now if you agree select the Accept the reCAPTCHA Terms of Service.

Now select Register.

Next page you will see Site key and Secret Key. Copy and paste these keys into the Integration under Contact Form.

Now under the client-side Integration copy both scripts that are just under the words

Paste this snippet before the closing </head> tag on your HTML template: (Copy this script so we can paste it to the header)

Paste this snippet in the JavaScript callback for an action on your website.(Copy this script so we can paste it to the header)

Be sure to go to the bottom of this page and hit Save Changes

I use and always have used a plug-in from WPBeginner Title Insert Headers and Footers,  use this plug-in  to insert both scripts into the header. Be sure to save.

Once this is completed, go back to your form and test! You should see a black and blue reCAPTCHA in the bottom right of you web site floating in the corner. This confirms that setup was successful.  Hover over the icon.

Note over time you can go back to My reCAPTCHA through Integration to see what is call the “score” to see now many spams were blocked using your reCAPTCHA with the form.